

Microsoft has made implementing simple Authorization requirements in ASP.NET Core 2 feel familiar to previous versions. But when you plan to implement something more complex, it’s very helpful to understand how things work under the hood. With that in mind, I’ll be writing a series of posts about how Authorization is currently implemented in Core 2.
Lay of The Land
It’s common for developers to think of Authorization and Authentication as the same thing, but they really have two different purposes. The job of Authentication is to confirm the identity of a user, while Authorization determines what a user can do. The criteria for allowing a user to perform an action may depend on the user’s membership in a role or group, a claim possessed by the user, or the state of a resource being acted upon. Microsoft’s design for Authorization in .NET Core 2 addresses those needs, and implements a separation of concerns, so that you can unit test authorization in your application. With this in mind, let’s begin with a brief introduction to policy based authorization.
What exactly is a Policy?
A policy is a list of requirements that a user must meet in order to perform an operation. Having a simple example to reference makes describing a policy easier, so I’ll use one from Microsoft’s “Blowdart” repository on Github.
services.AddAuthorization(options =>
{
     options.AddPolicy("AdministratorOnly", policy => policy.RequireRole("Administrator"));
     options.AddPolicy("EmployeeId", policy => policy.RequireClaim("EmployeeId", "123", "456"));
});
In this case the first policy is named “AdministratorOnly”, and its requirement is that the user is assigned to the “Administrator” role. The second policy, “EmployeeId”, requires that the user has a claim called “EmployeeId” that has a value of 123 or 456. Each of these policies has a single requirement, although they could have more.
When you examine the source code for the AuthorizationPolicy class, you’ll find a collection for the requirements. The requirements for a policy can range from requiring that the user is authenticated, is a member of a role, has a claim, or any number of other possibilities. The list of requirements is read only, so once that list is created, you can’t add more. Generally you’ll just create a new policy if needed.

There is another collection in the AuthorizationPolicy class for AuthenticationSchemes. They allow you to specify which authentication methods are allowed when a policy is being evaluated. This means you can have a policy that requires that the user is authenticated with a bearer token, or another that applies to cookies.
Policy.AuthenticationSchemes.Add(JwtBearerDefaults.AuthenticationScheme);
In the case of this policy, it would only be evaluated against an identity that was created with JWTBearer tokens, because the authentication scheme was added to the policy.
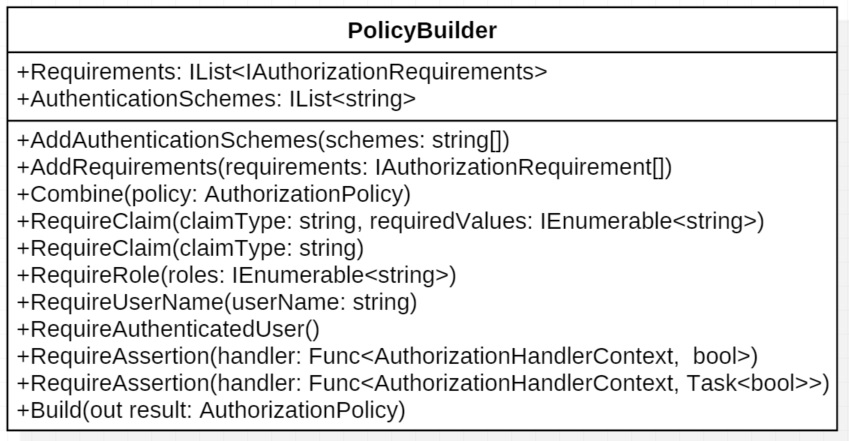
Looking back at the “Blowdart” example, the syntax for creating the policies might not be familiar to you. We’ll dig deeper later, but it’s suffice to say for now that IServiceCollection extensions take in a dictionary of Action delegates, and use the AuthorizationPolicyBuilder to create the policies. The AuthorizationPolicyBuilder class has various methods to add requirements to a policy and combine policies together. In the end, the Build method is called, and the new policy is created.
At this point, it probably looks like a big collection of strings, and you might be wondering where the actual work gets done. This brings us to authorization requirements.
What really goes into an authorization requirement?
In order to evaluate a requirement, you’ll need some information about the user, a chunk of code that does the evaluation, and sometimes metadata about the resource being secured. In ASP.NET Core, this is done with a few pieces working together. For the sake of type safety, there is an interface, IAuthorizationRequirement, that has no methods or properties defined. If you browse through the source code, you’ll find that the predefined requirement classes implement this interface. But we still need a place to put that chunk of code that does the evaluation. That class is called the AuthorizationHandler, and there are two types. One is used to evaluate requirements, and the second is designed to deal with requirements that secure a resource. For now, let’s set aside securing a resource.
public abstract class AuthorizationHandler : IAuthorizationHandler
     where TRequirement : IAuthorizationRequirement
The handler class is a generic that implements the HandleAsync method. That method is provided with some context information, about the user, and in turn calls the HandleRequirementAsync method.
protected abstract Task HandleRequirementAsync(AuthorizationHandlerContext context, TRequirement requirement);
The logic to evaluate the requirement is found in the HandleRequirementAsync function. It takes in the needed information about the user in the form of the AuthorizationHandlerContext class. The requirement will in all likelihood have some state, so it needs to be passed into the evaluation function too. Looking at an example will help make sense of it all. There is a NameAuthorizationRequirement class that checks to make sure the name of the user is equal is one of the specified values.
protected override Task HandleRequirementAsync(AuthorizationHandlerContext context, NameAuthorizationRequirement requirement)
{
     if (context.User != null)
     {
          if (context.User.Identities.Any(i => string.Equals(i.Name, requirement.RequiredName)))
          {
               context.Succeed(requirement);
          }
     }
     return Task.CompletedTask;
}
Here you can see that the context has a property with the user information, and in this case the requirement has a string, RequiredName, that needs to match the name of the user. When they match, the Succeed method on the context is called. The context actually stores the results of all the requirement evaluations and aggregates the result.
One of the benefits of this design is that it can be unit tested. Here is one of Microsoft’s unit tests found on GitHub. It employs some classes I have not talked about yet, but you can see that it lets you set up a test, and validate that the requirements are evaluated properly. Separating the authorization logic from the business logic, makes this testing so much easier.
[Fact]
public async Task CanRequireUserName()
{
     // Arrange
     var authorizationService = BuildAuthorizationService(services =>
     {
          services.AddAuthorization(options =>
          {
               options.AddPolicy("Hao", policy => policy.RequireUserName("Hao"));
          });
     });
     var user = new ClaimsPrincipal(
     new ClaimsIdentity(
          new Claim[] {
               new Claim(ClaimTypes.Name, "Hao"),
          },
          "AuthType")
     );

     // Act
     var allowed = await authorizationService.AuthorizeAsync(user, "Hao");

     // Assert
     Assert.True(allowed.Succeeded);
}
I’ve presented a somewhat simplified view of requirements and how they are evaluated. It’s worth while to learn more about how resources can be included, and how logical operations can be used with a policy’s requirements for complex scenarios. More on that in the next post.