Thank you to Paul Ebreo for organizing last nights Meetup!
If you would like to take a look at the sample code or the slide deck from last night’s presentation…Here it is!
Solving problems with SQL Server and Microsoft .NET

Thank you to Paul Ebreo for organizing last nights Meetup!
If you would like to take a look at the sample code or the slide deck from last night’s presentation…Here it is!

Nothing disturbs the flow of automobile traffic like a sink hole big enough to swallow your car. Drivers need to navigate around it, and they become scared to death that another one will appear. HTTP 403 Forbidden error messages have a similar effect. When a user is happily clicking through your web page and suddenly get an error message, because they don’t have authorization to perform an operation, it has a really negative effect. They don’t have an understanding of why it occurred, so it’s up to you to prevent these type of problems.To provide a good user experience, UI elements that lead to an action the user can not perform should be hidden, modified, or never included in the page at all. The trick to making this easier, is to leverage the tools and code you have already put in place to protect Controllers and Actions in your ASP.NET Core application. Let’s take a look at using existing Authorization Policies and Tag Helpers when constructing Views.
Authorization checks in ASP.NET Core can be made imperatively using an instance of the IAuthorizationService. It has a method called AuthorizeAsync that can take in a user, a policy name, and on optional resource to determine if the user has can perform an operation. This means that we can use the same policies that were defined in our StartUp.cs file to find out if a user will be able to execute an action in a controller. To make that happen, we’re going to need the same instance of IAuthorization that was configured in the Startup.cs file. The dependency injection system that comes with ASP.NET Core is also available in Razor views, so we can use it to get a copy of the authorization service. The @inject directive can be added to the top of a Razor page along with a variable declaration to get a reference to the object in the dependency injection system. If you need to include authorization checks on all of your pages, it may make sense to include the authorization service in the _ViewImports.cshtml file. Any using or injection directives you add to the _ViewImports.cshtml file will become part of any view that get rendered.
@using Microsoft.AspNetCore.Authorization
@inject IAuthorizationService AuthorizationService
Once we have used DI to get an instance of IAuthorizationService, we can use it to perform authorization evaluations. Suppose we have a list of resources, and we want to display a link to each resource that the user can view. We could simply loop through the collection of resources and perform an authorization check passing in the resource. The AuthorizeAsync function found in the authorization service will perform the policy evaluation and return the result. We can use that result to decide if the link should be included in the page. For the example below, I’m using a resource that represents a server room, and the user must meet certain criteria in order to enter it.
@foreach (var serverRoom in Model)
{
  if ((await AuthorizationService.AuthorizeAsync(User,
                serverRoom,
               "EnterServerRoom")).Succeeded)
  {
    <a asp-controller="Home" asp-action="ServerRoom”
      class="btn btn-primary">@serverRoom.Name</a>
  }
}
Because we have a list of server rooms, we need to loop through each one, and perform a resource-based authorization check, using the instance of the ServerRoom class, along with the user, and the name of the policy. If the evaluation of the policy succeeds, the link is added to the page. Once you’ve gone through the process of setting up the policies for you application, adding Authorization checks to your View is very straight forward.
The problem is, including authorization checks in your Razor pages can make the code cumbersome and difficult to read. For this reason, I suggest you utilize a tag helper when implementing authorization in a view. It’s not terribly difficult to implement your own tag helper, and it will save a ton of time. To start, lets look at what information our tag helper will need to perform our authorization checks.
• An instance of the AuthorizationService.
• The user from the HttpContext.
• The resource we are evaluating.
• The name of the policy that we will evaluate.
With these requirements in mind, lets look at how we can build our tag helper.
Start with a new class called AuthorizationTagHelper. We’re going to need to include a few libraries for our class, so we can reference instances of the AuthorizationService and HttpContextAccessor, as well as inherit from the TagHelper base class.
using Microsoft.AspNetCore.Authorization;
using Microsoft.AspNetCore.Http;
using Microsoft.AspNetCore.Razor.TagHelpers;
Now we need to define the class, and decorate it with an HtmlTargetElement attribute. This will allow us to specify the attribute in our Razor code that causes the TagHelper to modify the HTML. For this case, I’ve chosen to use “authorize”. The first two pieces of information we need to perform an evaluation are the IAuthorizationService and HttpContextAccessor. We can get those via dependency injection, so I’ll create private readonly variables for them, and add them to the constructor of our new class. The resource and name of the policy must be specified by the user, so I’ve created a property for each. Because the user will be assigning them in the view, I want to give each property an attribute name.
[HtmlTargetElement(Attributes = "authorize")]
public class AuthorizationTagHelper : TagHelper
{
  private readonly IAuthorizationService
_authorizationService;
  private readonly IHttpContextAccessor
_httpContextAccessor;

  [HtmlAttributeName("policy-name")]
  public string PolicyName { get; set; }

  [HtmlAttributeName("authorize-resource")]
  public object Resource { get; set; }

  public AuthorizationTagHelper(IAuthorizationService authorizationService, IHttpContextAccessor httpContextAccessor)
  {
    _authorizationService = authorizationService;
    _httpContextAccessor = httpContextAccessor;
  }
}
The last thing we need to do is override the ProcessAsync function from the TagHelper base class.
public override async Task ProcessAsync(TagHelperContext context, TagHelperOutput output)
{
  if (!(await _authorizationService.AuthorizeAsync(_httpContextAccessor.HttpContext.User, Resource, PolicyName)).Succeeded)
  {
    output.TagName = null;
    output.SuppressOutput();
  }
  output.Attributes.RemoveAll("authorize");
}
Inside this method, we need to call AuthorizeAsync just like we would have done in the Razor code. The difference here is that we need to change the output based on the result of the authorization evaluation. If the output should not be included in the page, if the authorization check fails. To do this, we set the element the “authorize” tag was placed on to null to remove it from the page, and call output.SuppressOutput(). If the check succeeded, we don’t have to do anything. For sake of keeping the HTML clean, we can remove the “authorize” tag by calling output.Attributes.RemoveAll(“authorize”);
Here is an example of how our Tag Helper can clean up our Razor code.
<h3>Server Rooms:</h3>
@foreach (var serverRoom in Model)
{
  if ((await AuthorizationService.AuthorizeAsync(User, serverRoom, nameof(CustomPolicies.EnterServerRoom))).Succeeded)
  {
    <a asp-controller="Home" asp-action="ServerRoom" asp-route-id="@serverRoom.Name" class="btn btn-primary">@serverRoom.Name</a>
  }
}

<h3>TagHelperTest</h3>
@foreach (var serverRoom in Model)
{
  <a authorize policy-name=@nameof(CustomPolicies.EnterServerRoom) authorize-resource=serverRoom asp-controller="Home" asp-action="ServerRoom" asp-route-id="@serverRoom.Name" class="btn btn-primary">@serverRoom.Name</a>
}
Looks much cleaner, and you won’t have to worry about traffic hitting those 403 errors!
I’m very excited to present in this year’s Chicago Code Camp!

This year’s topic is …
Microsoft’s transition to a claims based identity model, and policy based authorization opens the door to new techniques to manage modern applications. I’ll briefly explain the basics of Authorization in ASP.NET Core, then take a deeper dive into custom policies, authentication schemes, combining authorization requirements, resource-based, and view-based authorization. We’ll look at how these techniques can decouple authorization logic from business code and facilitate unit testing. Finally, I’ll talk about the benefits of using an authorization server when trying to administer the services feeding your applications.
If you attended my session and want to get a copy of the presentation or demo code, you’ve come to the right place.

DevExpress has a line of web controls that I’ve been playing with.
https://js.devexpress.com/
On the whole, I think they are good. I have found the documentation to be plentiful, but the specifics can be scattered in different places. Which is why I’m sharing my experience with their data grid control. It’s more formally called a dxDataGrid. My goal was to simply have an input tag that could hold a foreign key ID. When that value changed, I wanted the data grid to be updated with JSON data from a WebAPI. Pretty common scenario, but I didn’t see a copy & paste example in the documentation that didn’t use Angular. So here is an example to save you some time.
I’m limiting the code to only the relevant parts. It basically displays a list of applications. When you click on one, the data grid gets populated with a list of roles for the application.
<div id="applicationList"></div>
<input id=”applicationExternalID” />
<div id=”applicationRolesGrid”></div>
In terms of the markup, this is pretty minimal. DevExpress offers some tag helpers that you can use to create the controls, but they stick a bunch of java script in the middle of the HTML, and I rather keep the java script in separate files. All the configuration can be done in JS.
(function ($) {

    var applicationList = $("#applicationList").dxList({
        dataSource: DevExpress.data.AspNet.createStore({
            key: "ApplicationID",
            loadUrl: "https://localhost:44356/application/GetApplicationsByTenant",
            onBeforeSend: function (method, ajaxOptions) {
                ajaxOptions.xhrFields = { withCredentials: true };
            }
        }),
        height: 400,
        itemTemplate: function (data) {
            return $("<div>").text(data.DisplayName);
        },
        onItemClick: function (e) {
            var externalID = e.itemData.ExternalID;
            $("#applicatonExternalID").val(externalID);
            $("#DisplayName").text(e.itemData.DisplayName);

            roleSource = DevExpress.data.AspNet.createStore({
                key: "ApplicationRoleID",
                loadUrl: "https://localhost:44356/application/GetApplicationRolesByApplication",
                loadParams: { externalID: externalID },
                onBeforeSend: function (method, ajaxOptions) {
                    ajaxOptions.xhrFields = { withCredentials: true };
                }
            })
            applicationRolesGrid.option('dataSource', roleSource);
            applicationRolesGrid.refresh();
        }
    }).dxList("instance");

    var rolesSource = DevExpress.data.AspNet.createStore({
        key: "ApplicationRoleID",
        loadUrl: "https://localhost:44356/application/GetApplicationRolesByApplication",
        onBeforeSend: function (method, ajaxOptions) {
            ajaxOptions.xhrFields = { withCredentials: true };
        }
    })

    var applicationRolesGrid = $("#applicationRolesGrid").dxDataGrid({

        columns: [{
            dataField: "ApplicationRoleID",
            width: 80
        }, {
            dataField: "DisplayName"
        }],

        paging: {
            pageSize: 10
        }
    }).dxDataGrid("instance");

}(jQuery))
So the first thing to take note of is the data stores that are used. DevExpress has created a project on GitHub that allows their client side widgets (controls) to consume data from a ASP.NET web api.
https://github.com/DevExpress/DevExtreme.AspNet.Data
In the case of loading data for the list of applications, I was able to provide the data store with a URL to get the data. You can pass it credentials, and specify a key for each unique record. This is a pretty easy use case. To tell the dxList to use the data store, just set the list’s dataSource parameter to an instance of the data store. The rest is pretty much magic.
I actually create a second data store to get the list of roles for the selected application. This one will require the use of a parameter called loadParams. The WebAPI has a function that takes in a string called externalID, so the loadParams is provided with an object that contain the property externalID.
public async Task<IActionResult> GetApplicationRolesByApplication(string externalID)
This parameter should change every time a different item is clicked in the dxList. So I’ve added a handler to the dxList.onItemClick event. When that happens, I need to update the loadParams object with the new externalID. Here is the sticky party. I expected that I could call the data grid’s refresh method, and it would make the call to the web api and display the new data. But that’s not the case. I actually had to reassign the dxGrid’s dataSource property. That can be done by using the option function to reassign the dataSource property.
applicationRolesGrid.option('dataSource', roleSource);
This is really pretty simple to use, you have to find all the bits that need to be touched. If you know of better ways to do this, feel free to post in the comments.
Last night I got stuck trying to fix a bug in a REST API that really drove me nuts, so I’ll share in the hopes it will save someone else a headache.
The service uses JWTs for authentication, and are issued in an authentication controller, while the data is provided by another controller. I have a CreateToken method that creates an instance of ApplicationUser for the requested user, and adds some claims.
                        var claims = new[]
                        {
                              new Claim(JwtRegisteredClaimNames.Sub, user.UserName),
                              new Claim(JwtRegisteredClaimNames.Jti, Guid.NewGuid().ToString()),
                              new Claim(JwtRegisteredClaimNames.Email, user.Email)
                        }.Union(userClaims);
I’m sure this looks familiar if you’ve used JWTs in .NET. The method creates a valid token, and returns it to the user. The user can then take that token and pass it along to a different controller for authentication. In my case, I had customized the ApplicationUser to include a property called TenantID, and in the controller, I needed to create an instance of the ApplicationUser, and use the TenantID.
var user = await _userManager.GetUserAsync(User);
The problem was that the GetUserAsync(User) always returned null. After screwing around with it for way too long, I went to GitHub to see what GetUserAsync was actually doing.
https://github.com/aspnet/Identity/blob/dev/src/Core/UserManager.cs
It calls GetUserID, and passes in the ClaimsPrincipal.
        public virtual string GetUserId(ClaimsPrincipal principal)
	        {
	            if (principal == null)
	            {
	                throw new ArgumentNullException(nameof(principal));
	            }
	            return principal.FindFirstValue(Options.ClaimsIdentity.UserIdClaimType);
	        }
It wants to find the first claim associated with the UserIdClaimType….Which is what?
JwtRegisteredClaimNames.Sub
When I was creating the token, I was giving the Sub claim the user’s username, but ASP.NET identity was searching the database for the Id field in the AspNetUsers table in SQL.
So I changed the assignment when the token is created, and everything seems to work fine now.
                        var claims = new[]
                        {
                              new Claim(JwtRegisteredClaimNames.Sub, user.Id),
                              new Claim(JwtRegisteredClaimNames.UniqueName, user.UserName),
                              new Claim(JwtRegisteredClaimNames.Jti, Guid.NewGuid().ToString()),
                              new Claim(JwtRegisteredClaimNames.Email, user.Email)
                        }.Union(userClaims);

Microsoft has made implementing simple Authorization requirements in ASP.NET Core 2 feel familiar to previous versions. But when you plan to implement something more complex, it’s very helpful to understand how things work under the hood. With that in mind, I’ll be writing a series of posts about how Authorization is currently implemented in Core 2.
It’s common for developers to think of Authorization and Authentication as the same thing, but they really have two different purposes. The job of Authentication is to confirm the identity of a user, while Authorization determines what a user can do. The criteria for allowing a user to perform an action may depend on the user’s membership in a role or group, a claim possessed by the user, or the state of a resource being acted upon. Microsoft’s design for Authorization in .NET Core 2 addresses those needs, and implements a separation of concerns, so that you can unit test authorization in your application. With this in mind, let’s begin with a brief introduction to policy based authorization.
A policy is a list of requirements that a user must meet in order to perform an operation. Having a simple example to reference makes describing a policy easier, so I’ll use one from Microsoft’s “Blowdart” repository on Github.
services.AddAuthorization(options =>
{
     options.AddPolicy("AdministratorOnly", policy => policy.RequireRole("Administrator"));
     options.AddPolicy("EmployeeId", policy => policy.RequireClaim("EmployeeId", "123", "456"));
});
In this case the first policy is named “AdministratorOnly”, and its requirement is that the user is assigned to the “Administrator” role. The second policy, “EmployeeId”, requires that the user has a claim called “EmployeeId” that has a value of 123 or 456. Each of these policies has a single requirement, although they could have more.
When you examine the source code for the AuthorizationPolicy class, you’ll find a collection for the requirements. The requirements for a policy can range from requiring that the user is authenticated, is a member of a role, has a claim, or any number of other possibilities. The list of requirements is read only, so once that list is created, you can’t add more. Generally you’ll just create a new policy if needed.

There is another collection in the AuthorizationPolicy class for AuthenticationSchemes. They allow you to specify which authentication methods are allowed when a policy is being evaluated. This means you can have a policy that requires that the user is authenticated with a bearer token, or another that applies to cookies.
Policy.AuthenticationSchemes.Add(JwtBearerDefaults.AuthenticationScheme);
In the case of this policy, it would only be evaluated against an identity that was created with JWTBearer tokens, because the authentication scheme was added to the policy.
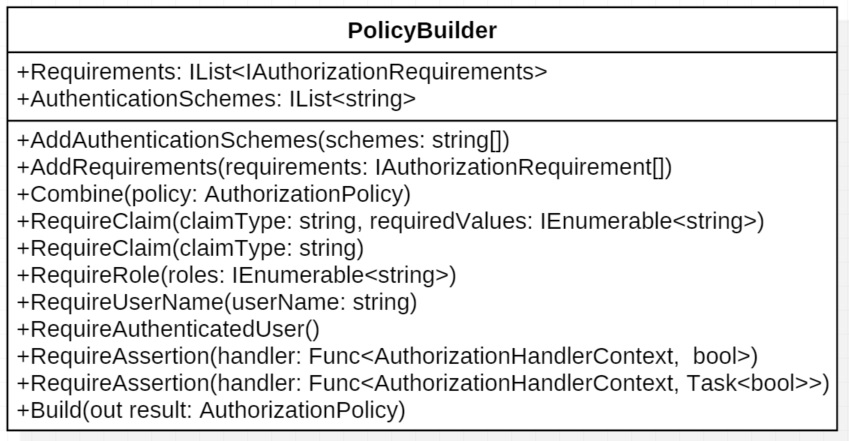
Looking back at the “Blowdart” example, the syntax for creating the policies might not be familiar to you. We’ll dig deeper later, but it’s suffice to say for now that IServiceCollection extensions take in a dictionary of Action delegates, and use the AuthorizationPolicyBuilder to create the policies. The AuthorizationPolicyBuilder class has various methods to add requirements to a policy and combine policies together. In the end, the Build method is called, and the new policy is created.
At this point, it probably looks like a big collection of strings, and you might be wondering where the actual work gets done. This brings us to authorization requirements.
In order to evaluate a requirement, you’ll need some information about the user, a chunk of code that does the evaluation, and sometimes metadata about the resource being secured. In ASP.NET Core, this is done with a few pieces working together. For the sake of type safety, there is an interface, IAuthorizationRequirement, that has no methods or properties defined. If you browse through the source code, you’ll find that the predefined requirement classes implement this interface. But we still need a place to put that chunk of code that does the evaluation. That class is called the AuthorizationHandler, and there are two types. One is used to evaluate requirements, and the second is designed to deal with requirements that secure a resource. For now, let’s set aside securing a resource.
public abstract class AuthorizationHandler : IAuthorizationHandler
     where TRequirement : IAuthorizationRequirement
The handler class is a generic that implements the HandleAsync method. That method is provided with some context information, about the user, and in turn calls the HandleRequirementAsync method.
protected abstract Task HandleRequirementAsync(AuthorizationHandlerContext context, TRequirement requirement);
The logic to evaluate the requirement is found in the HandleRequirementAsync function. It takes in the needed information about the user in the form of the AuthorizationHandlerContext class. The requirement will in all likelihood have some state, so it needs to be passed into the evaluation function too. Looking at an example will help make sense of it all. There is a NameAuthorizationRequirement class that checks to make sure the name of the user is equal is one of the specified values.
protected override Task HandleRequirementAsync(AuthorizationHandlerContext context, NameAuthorizationRequirement requirement)
{
     if (context.User != null)
     {
          if (context.User.Identities.Any(i => string.Equals(i.Name, requirement.RequiredName)))
          {
               context.Succeed(requirement);
          }
     }
     return Task.CompletedTask;
}
Here you can see that the context has a property with the user information, and in this case the requirement has a string, RequiredName, that needs to match the name of the user. When they match, the Succeed method on the context is called. The context actually stores the results of all the requirement evaluations and aggregates the result.
One of the benefits of this design is that it can be unit tested. Here is one of Microsoft’s unit tests found on GitHub. It employs some classes I have not talked about yet, but you can see that it lets you set up a test, and validate that the requirements are evaluated properly. Separating the authorization logic from the business logic, makes this testing so much easier.
[Fact]
public async Task CanRequireUserName()
{
     // Arrange
     var authorizationService = BuildAuthorizationService(services =>
     {
          services.AddAuthorization(options =>
          {
               options.AddPolicy("Hao", policy => policy.RequireUserName("Hao"));
          });
     });
     var user = new ClaimsPrincipal(
     new ClaimsIdentity(
          new Claim[] {
               new Claim(ClaimTypes.Name, "Hao"),
          },
          "AuthType")
     );

     // Act
     var allowed = await authorizationService.AuthorizeAsync(user, "Hao");

     // Assert
     Assert.True(allowed.Succeeded);
}
I’ve presented a somewhat simplified view of requirements and how they are evaluated. It’s worth while to learn more about how resources can be included, and how logical operations can be used with a policy’s requirements for complex scenarios. More on that in the next post.
To add JWT bearer authentication to an ASP.net Core site, you’ll need to add the JWTBearer middleware to the application. The middleware is found in the Microsoft.AspNetCore.Authentication.JwtBearer namespace, and will allow the service to validate a token, and create a ClaimsPrincipal with the claims in the token. To add the middleware to the service, we’ll start by adding authentication with the options DefaultAuthenticationScheme and DefaultChallengeScheme set to JwtBearerDefaults.AuthenticationScheme. So when the [Authorize] attribute is put on controllers or actions, they will default to use JwtBearer authentication. In the Startup.cs file, there should be a ConfigureServices function that provides you with a IServiceCollection interface to do the configuring.
public void ConfigureServices(IServiceCollection services)
{
     services.AddDbContext<RESTContext>();
     services.AddIdentity<IdentityUser, IdentityRole>()
          .AddEntityFrameworkStores<RESTContext>();

     services.AddAuthentication(options =>
     {
          options.DefaultAuthenticateScheme = JwtBearerDefaults.AuthenticationScheme;
          options.DefaultChallengeScheme = JwtBearerDefaults.AuthenticationScheme;
     })

...

}
The next service we need to add is the JwtBearer service, which allows configuration with the JwtBearerOptions parameter. Here are a list of several of the options.
     services.AddAuthentication(options =>
     {
          options.DefaultAuthenticateScheme = JwtBearerDefaults.AuthenticationScheme;
          options.DefaultChallengeScheme = JwtBearerDefaults.AuthenticationScheme;

     }).AddJwtBearer(options =>
     {
          options.Audience = Configuration["Tokens:Issuer"];
          options.RequireHttpsMetadata = true;
Take note that I did not set the Authority option. The code sample is running a web application that issues and authenticates tokens that it creates. It is not reaching out to an authentication server to validate the token’s signature. If you were going to use a third party service to provide authentication, than this option becomes important.
We will also need to set the parameters that are used to validate a token. In ASP.net Core 2, this is done with the TokenValidationParameters object.
These are a list of the relevant options.
     services.AddAuthentication(options =>
     {
          options.DefaultAuthenticateScheme = JwtBearerDefaults.AuthenticationScheme;
          options.DefaultChallengeScheme = JwtBearerDefaults.AuthenticationScheme;

     }).AddJwtBearer(options =>
     {
          options.Audience = Configuration["Tokens:Issuer"];
          options.RequireHttpsMetadata = true;
          options.TokenValidationParameters = new TokenValidationParameters
          {
               ValidateIssuerSigningKey = true,
               ValidateIssuer = true,
               ValidIssuer = Configuration["Tokens:Issuer"],
               IssuerSigningKey = new SymetricSecurityKey(Encoding.UTF9.GetBytes(Configuration["Tokens:Key"])),
               ValidateLifetime = true
           };
Now the last thing we need to do here is handle the event that gets fired when authentication has failed.
               ValidateIssuer = true,
               ValidIssuer = Configuration["Tokens:Issuer"],
               IssuerSigningKey = new SymetricSecurityKey(Encoding.UTF9.GetBytes(Configuration["Tokens:Key"])),
               ValidateLifetime = true
           };
          options.Events = new JwtBearerEvents()
          {
               OnAuthenticationFailed = c =>
               {
                    c.NoResult();
                    c.Response.StatusCode = 500;
                    c.Response.ContentType = "text/plain";
                    return c.Response.WriteAsync("An error occurred processing your authentication.");
               }
          };
Once the middleware is configured and added to the pipeline, you can use standard authorize attributes on your controllers.
You could also specify that a controller or action use JwtBearer authentication as part of the attribute if you need to be specific.
[Authorize(AuthenticationSchemess = JwtBearerDefaults.AuthenticationScheme)]
The typical scenario for creating a JWT would be to have an action in a controller that authenticates a user and returns a token. That token could then be used to authenticate the user for other actions. We’re going to need the help of some classes built into the framework.
using System;
using System.Text;
using System.Linq;
using System.Threading.Tasks;
using System.IdentityModel.Tokens.Jwt;

using Microsoft.AspNetCore.Identity;
using Microsoft.AspNetCore.Mvc;
using Microsoft.Extensions.Logging;
using Microsoft.Extensions.Configuration;
using Microsoft.IdentityModel.Tokens;
Several classes need to be initialized via dependency injection, so here is the constructor for the controller.
public AuthController(SignInManager<IdentityUser> signInManager,
                      UserManager<IdentityUser> userManager,
                      IPasswordHasher<IdentityUser> hasher,
                      IConfiguration configuration,
                      ILogger<AuthController> logger)
{
     _signInManager = signInManager;
     _userManager = userManager;
     _hasher = hasher;
     _configuration = configuration;
     _logger = logger;
}
With the groundwork set, let’s look at the function, that will create the JWT.
[ValidateModel]
[HttpPost]
public async Task<IActionResult> CreateToken([FromBody] CredentialModel model)
{
}
The action takes in a CredentialModel, which is just a class with two string properties (Username and Password). Both the properties are annotated with the [Required] attribute. The CreateToken action is decorated with the [ValidateModel], so the model can be checked for a valid model at the beginning of the function. If the model is not valid, we’ll just log it to the informational log, and return a bad request.
if(!ModelState.IsValid)
{
     _logger.LogInformation($"Invalid CredentialModel passed to CreateToken (UserName:{model.UserName} Password:{model.Password}");
     return BadRequest("Failed to create token.");
}
The next step is to authenticate the user with the UserManager from Microsoft.AspNetCore.Identity. One option would be to use an instance of SignInManager
try
{
     var user = await _userManager.FindByNameAsync(model.UserName);

     if(user != null)
     {
          if (_hasher.VerifyHashedPassword(user, user.PasswordHash, model.Password) == PasswordVerificationResult.Success)
          {
               //Create Token
          }
     }
}
catch (Exception ex)
{
     _logger.LogError($"Exception thrown while creating JWT: {ex}");
}
Now let’s work on creating the token.
var userClaims = await = _userManager.GetClaimsAsync(user);

var claims = new[]
{
     new Claim(JwtRegisteredClaimNames.Sub, user.UserName),
     new Claim(JwtRegisteredClaimNames.Jti, Guid.NewGuid().ToString()),
     new Claim(JwtRegisteredClaimNames.Email, user.Email)
}.Union(userClaims);

var key = new SymetricSecurityKey(Encoding.UTF8.GetBytes(_configuration["Tokens:Key"]));
var creds = new SigningCredentials(key, SecurityAlgorithms.HmacSha256);

var token = new JwtSecurityToken(
     issuer: _configuration["Tokens:Issuer"],
     audience: _configuration["Tokens:Audience"],
     claims: claims,
     expires: DateTime.UtcNow.AddMinutes(15),
     signingCredentials: creds);

return Ok(new
{
     token = new JwtSecurityTokenHandler().WriteToken(token),
     expiration = token.ValidTo
});
Remember that the payload of the JWT is made up of claims, so the first step is to build up a set of claims for the user. The UserManager will return an array of claims, and we can merge those with some commonly used Registered Claims. For example, Jti is the JWT ID claim that provides a unique identifier to prevent replay attacks.
The next step is to create a key and signing credentials. The key is created based on a string found in the config file. Getting this from a key store, or some other method is a MUCH better idea.
Microsoft uses the JwtSecurityToken class to represent JWTs. The constructor takes the elements of a JWT that were mentioned in part 1. Once we have the token, we can return it from the function.
In the last part of this series, I’ll tell you how you can consume the JWT as part of a REST service.
JSON Web Token, prounced “jot”, is an open standard that lets you securely transmit information as a JSON object. The token can be signed with a secret using HMAC or a public/private key using RSA. This makes JWTs a great option for authentication. Each JWT is comprised of three parts separated by dots, which are the header, payload, and signature.
Here is an example of a JWT.
eyJhbGciOiJIUzI1NiIsInR5cCI6IkpXVCJ9.
eyJzdWIiOiIxMjM0NTY3ODkwIiwibmFtZSI6IkpvaG4gRG9lIiwiYWRtaW4iOnRydWV9.
TJVA95OrM7E2cBab30RMHrHDcEfxjoYZgeFONFh7HgQ
The header defines what kind of token it is, and the type of hashing algorithm that was used to create the token.
{
“alg”: “HS256”,
“typ”: “JWT”
}
The header is Base64URL encoded, which then becomes the first third of the JWT.
eyJhbGciOiJIUzI1NiIsInR5cCI6IkpXVCJ9
The second part of the token is the payload, and contains claims and any other metadata about the user. In the example below, claims are included in the payload and then encrypted to create the payload.
{
“sub”: “1234567890”,
“name”: “John Doe”,
“admin”: true
}
eyJzdWIiOiIxMjM0NTY3ODkwIiwibmFtZSI6IkpvaG4gRG9lIiwiYWRtaW4iOnRydWV9
The claims used in the payload are categorized into three groups.
Registered Claims are predefined claims that are defined in RFC 7519. An application should define which claims it uses, and when they are required or optional. The names of the claims are short, three letters, to keep the size of the token small.
Public Claims are defined by who ever is creating the token. The concern here is to choose a name that is not likely to collide with another claim name. Ideally, they should be registered in the IANA “JSON Web Token Claims” registry.
Private Claims are agreed to be used by the who ever produced the token, and those who consume the token. The names are not registered, and are likely to be subject to collisions.
The purpose of the signature is to verify that the sender is who they say they are, and to ensure that the token was not altered in transmission. The signature is created by combining the encoded header, the encoded payload, and a secret. The information is then encrypted.
Traditionally when a user logs into a server, the service will create a session in the server, and return a cookie. JWTs work a bit differently, because when the service authenticates a consumer, it will create the JWT and return it to the consumer, where it is stored locally. On subsequent calls to the service, the consumer includes the JWT in the Authorization header using the Bearer schema.
Authorization: Bearer
There are multiple benefits to this method. The authentication method is stateless, because there is no need to maintain a session on the server. Furthermore, the JWTs are self-contained, and don’t require additional calls to a database to validate the credentials. If you have a service that makes calls to other APIs, you can simple pass the JWT along. There is no restriction on what domain is serving the API, so CORS, Cross-Origin Resource Sharing, is not an issue.
Static types generally have static member variables that need to be initialized before an instance of the type can be used. There are a couple of common ways to do that. A static constructor can initialize those variables before they are accessed. They are a good option when you need to have logic built into the initialization process. Static initializers are useful when you only have to allocate the static member.
        private static readonly WeatherMan _instance = new WeatherMan();
        static WeatherMan()
        {
            _instance = new WeatherMan();
        }
If there is a reasonable chance that initializing a member variable could result in an exception, you may want to consider using a static constructor. You can’t catch an exception from a static initializer, with a static constructor you can. If an exception occurs in a static constructor, your program will terminate with an exception. If the caller of the static constructor tries to catch the exception, future attempts to create an instance of the type will fail until the AppDomain is unloaded. Ouch. So the only real option is to catch the exception in the static constructor, and add some recovery logic.